> For the complete documentation index, see [llms.txt](https://docs.payments.thalescloud.io/llms.txt). Markdown versions of documentation pages are available by appending `.md` to page URLs; this page is available as [Markdown](https://docs.payments.thalescloud.io/push-provisioning/ja/implement-push-provisioning/implement-push-to-digital-wallets/google-wallet-bounce-provisioning.md).
# Google Wallet の Bounce Provisioning
バウンスプロビジョニングを使用して、エンドユーザーが Google ウォレットからカードを検出してプロビジョニングできるようにします。
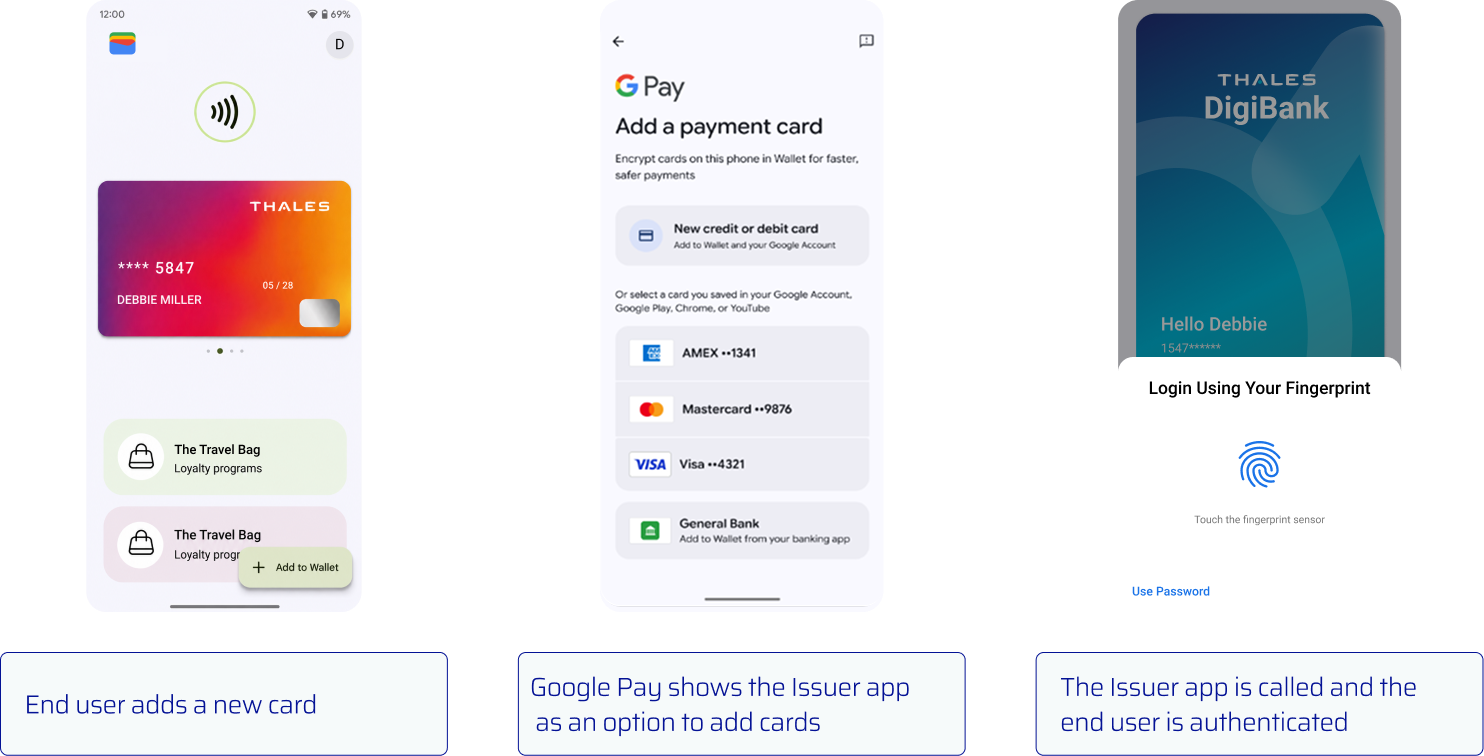
Google ウォレットは Android OS を通じてイシュアアプリケーションを検出します。イシュアアプリケーションはエンドユーザーを認証し、対象カードを表示します。
Google の要件については、 [Google Pay バウンスプロビジョニング](https://developers.google.com/pay/issuers/apis/push-provisioning/android/bounce_provisioning?authuser=0).
### ユーザー エクスペリエンス
バウンスプロビジョニングには 2 つのフェーズがあります:
1. Google ウォレットはイシュアアプリケーションを検出して起動します。
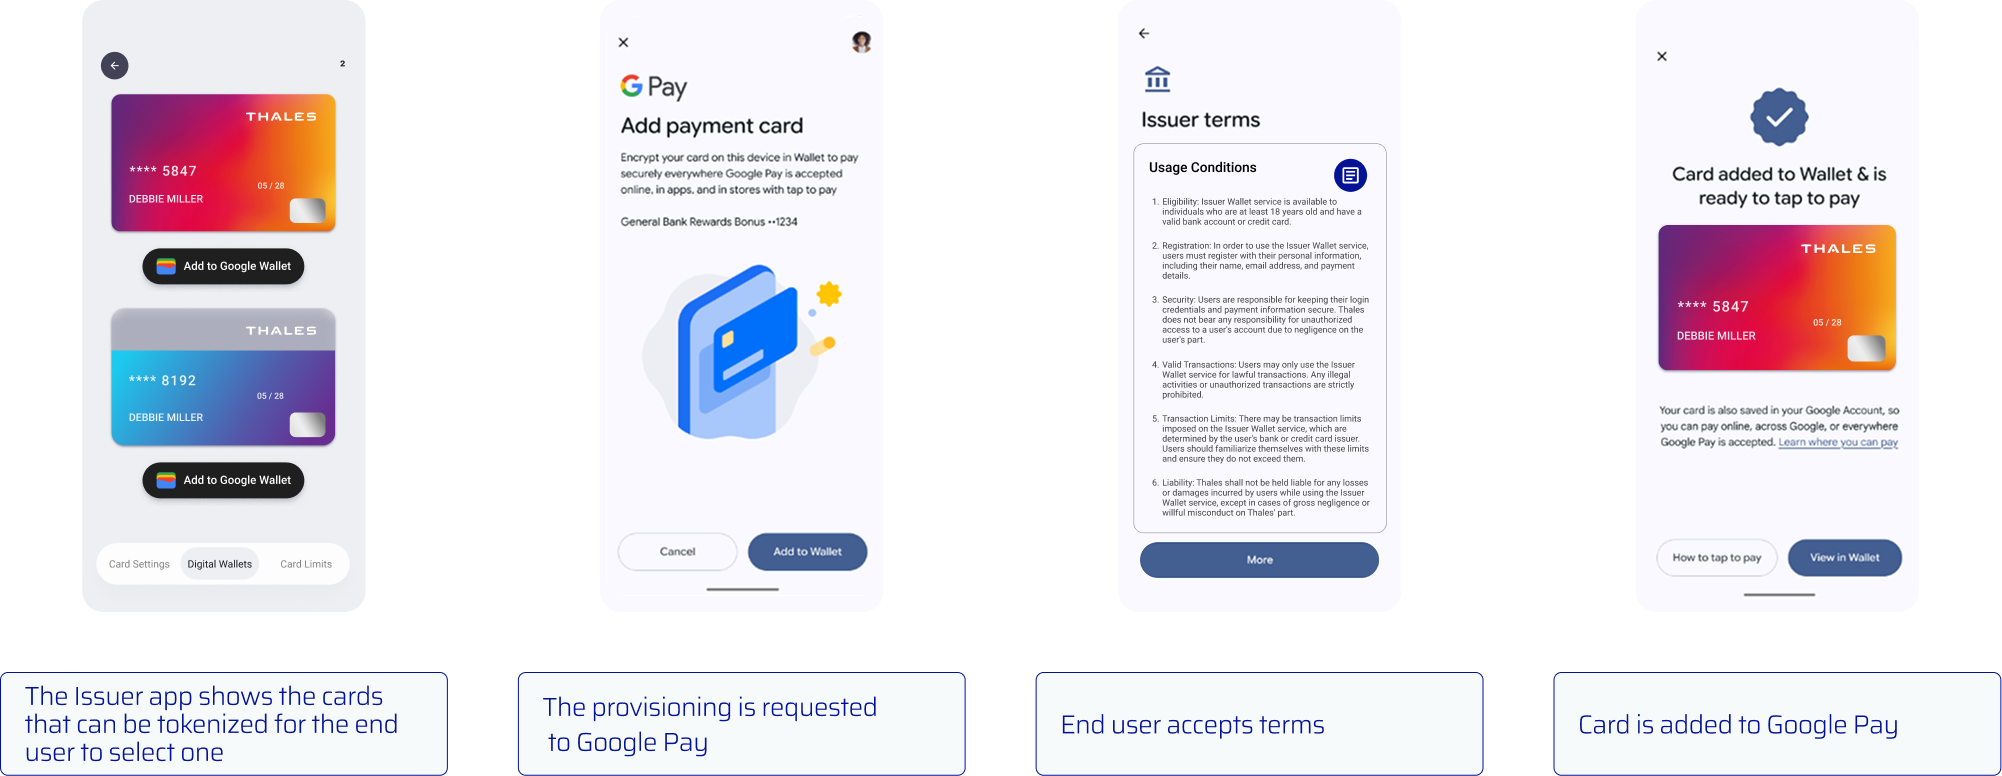
2. イシュアアプリケーションはエンドユーザーを認証し、トークン化を開始します。
#### 検出と認証
{% stepper %}
{% step %}
**Google ウォレットを開く**
エンドユーザーは Google ウォレットを開き、支払いカードを追加するオプションを選択します。
{% endstep %}
{% step %}
**イシュアアプリケーションを選択**
Google ウォレットは、Android マニフェストが登録要件を満たしている場合にイシュアアプリケーションを表示します。
{% endstep %}
{% step %}
**エンドユーザーを認証する**
Google ウォレットはイシュアアプリケーションを開きます。イシュアアプリケーションはエンドユーザーを認証します。
{% endstep %}
{% endstepper %}
#### カードを選択してプロビジョニングする
{% stepper %}
{% step %}
**対象カードを表示**
認証後、D1 SDK を使用して [各カードのデジタル化状態を取得します](/push-provisioning/ja/implement-push-provisioning/implement-push-to-digital-wallets/get-the-card-digitization-state.md)。トークン化の対象となるカードを表示します。
{% endstep %}
{% step %}
**プロビジョニングを開始**
エンドユーザーがカードを選択したら、次を呼び出します。 [D1 SDK の push-to-wallet API](/push-provisioning/ja/implement-push-provisioning/implement-push-to-digital-wallets/push-to-the-digital-wallet.md) で `オプション` に設定して `1`.
{% endstep %}
{% step %}
**利用規約に同意する**
Google ウォレットに該当する利用規約が表示されます。エンドユーザーはそれらに同意して続行します。
{% endstep %}
{% step %}
**カードを Google ウォレットに追加する**
Google ウォレットはトークン化を完了し、カードを追加します。
{% endstep %}
{% endstepper %}
### バウンスプロビジョニングを有効にする
#### 登録を完了する
必要なバウンスプロビジョニング登録を完了する [フォーム](https://developers.google.com/pay/issuers/apis/push-provisioning/android/bounce_provisioning) 機能を有効にする前に。
#### Android マニフェストを更新する
バウンスプロビジョニングは、D1 SDK バージョン以降の実機の Android デバイスで利用できます `4.5.0`.
対象カードを表示するアクティビティを作成します。次を追加します。 **Google ウォレットに追加** ボタンを各カードに追加します。次に、 `ACTION_INITIATE_PROVISIONING` インテントを `AndroidManifest.xml`.
```xml
```
{% hint style="warning" %}
含めて `カテゴリ` の要素を `intent-filter`。これがないと、Google Wallet はバウンス プロビジョニング用のイシュア アプリケーションを表示しません。
{% endhint %}
#### 新しい Android アクティビティを作成
{% code title="Google Pay バウンス プロビジョニング Activity (Java)" lineNumbers="true" %}
```java
// import
public class BounceProvisioningActivity extends FragmentActivity {
private D1Task d1Task; // 実際の D1Task インスタンスで初期化
@Override
protected void onCreate(@Nullable Bundle savedInstanceState) {
super.onCreate(savedInstanceState);
Intent intent = getIntent();
if (intent != null
&& "com.google.android.gms.tapandpay.issuer.ACTION_INITIATE_PROVISIONING"
.equals(intent.getAction())) {
// 利用可能なすべてのカードの一覧を表示し、各カードの横に「Google Wallet に追加」ボタンを表示します。
// Google Wallet に追加ボタンをクリックすると、options パラメータを 1 に設定した AddDigitalCardToOEM が呼び出されます。
} else {
// バウンス・プロビジョニング要求ではありません
}
}
@Override
public void onActivityResult(int requestCode, int resultCode, @Nullable Intent data) {
d1Task.handleCardResult(requestCode, resultCode, data);
}
}
```
{% endcode %}
---
# Agent Instructions
This documentation is published with GitBook. GitBook is the documentation platform designed so that both humans and AI agents can read, navigate, and reason over technical content effectively. Learn more at gitbook.com.
## Querying This Documentation
If you need additional information that is not directly available in this page, you can query the documentation dynamically by asking a question.
Perform an HTTP GET request on the current page URL with the `ask` query parameter, and the optional `goal` query parameter:
```
GET https://docs.payments.thalescloud.io/push-provisioning/ja/implement-push-provisioning/implement-push-to-digital-wallets/google-wallet-bounce-provisioning.md?ask=&goal=
```
`ask` is the immediate question: it should be specific, self-contained, and written in natural language.
`goal` is optional and describes the broader end goal you are ultimately trying to accomplish on behalf of the user. GitBook uses it to tailor the answer towards what is most useful for that goal.
The response will contain a direct answer to the question and relevant excerpts and sources from the documentation.
Use this mechanism when the answer is not explicitly present in the current page, you need clarification or additional context, or you want to retrieve related documentation sections.