> For the complete documentation index, see [llms.txt](https://docs.payments.thalescloud.io/llms.txt). Markdown versions of documentation pages are available by appending `.md` to page URLs; this page is available as [Markdown](https://docs.payments.thalescloud.io/push-provisioning/implement-push-provisioning/implement-push-to-digital-wallets/google-wallet-bounce-provisioning.md).
# Google wallet bounce provisioning
Use bounce provisioning to let end users discover and provision cards from Google Wallet.
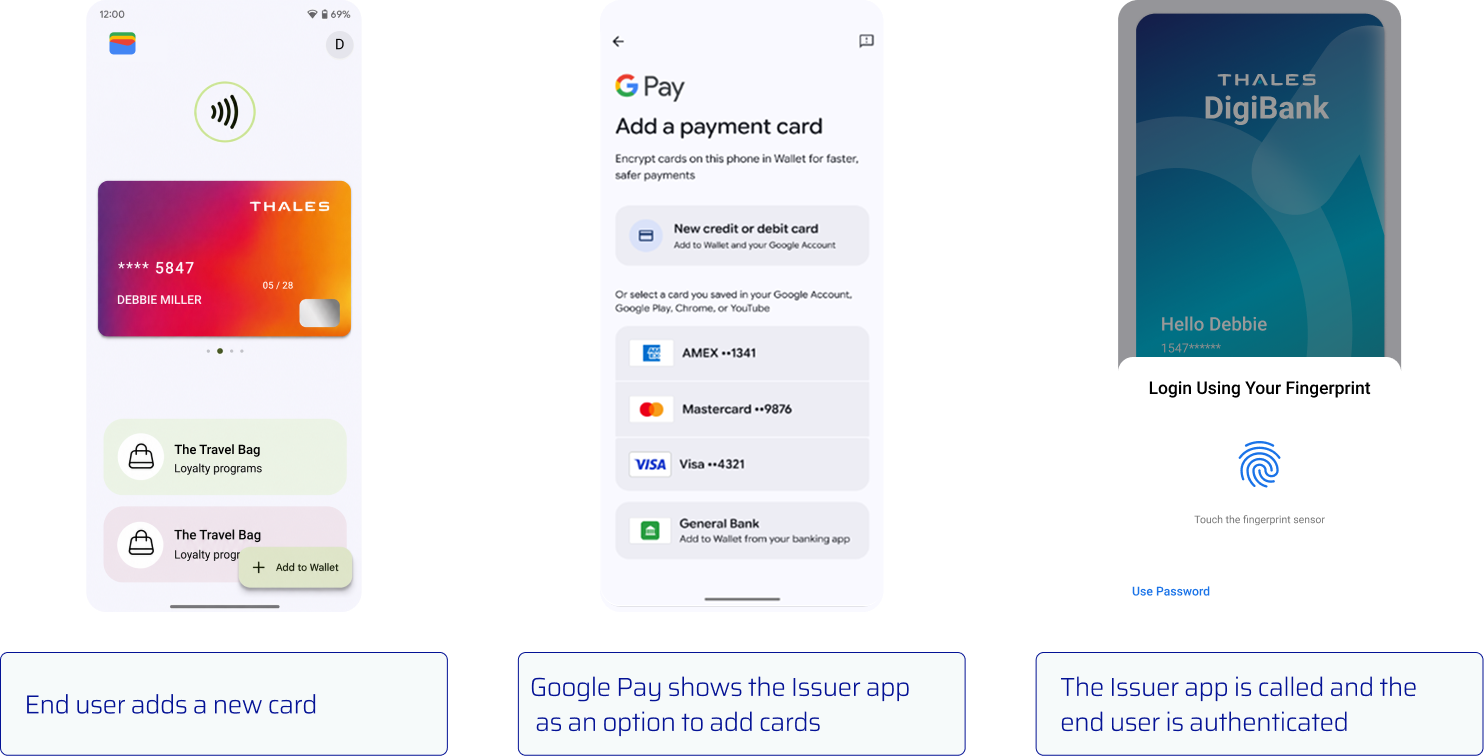
Google Wallet discovers the issuer application through Android OS. The issuer application authenticates the end user and displays eligible cards.
For Google requirements, see [Google Pay Bounce Provisioning](https://developers.google.com/pay/issuers/apis/push-provisioning/android/bounce_provisioning?authuser=0).
### User experience
Bounce provisioning has two phases:
1. Google Wallet discovers and launches the issuer application.
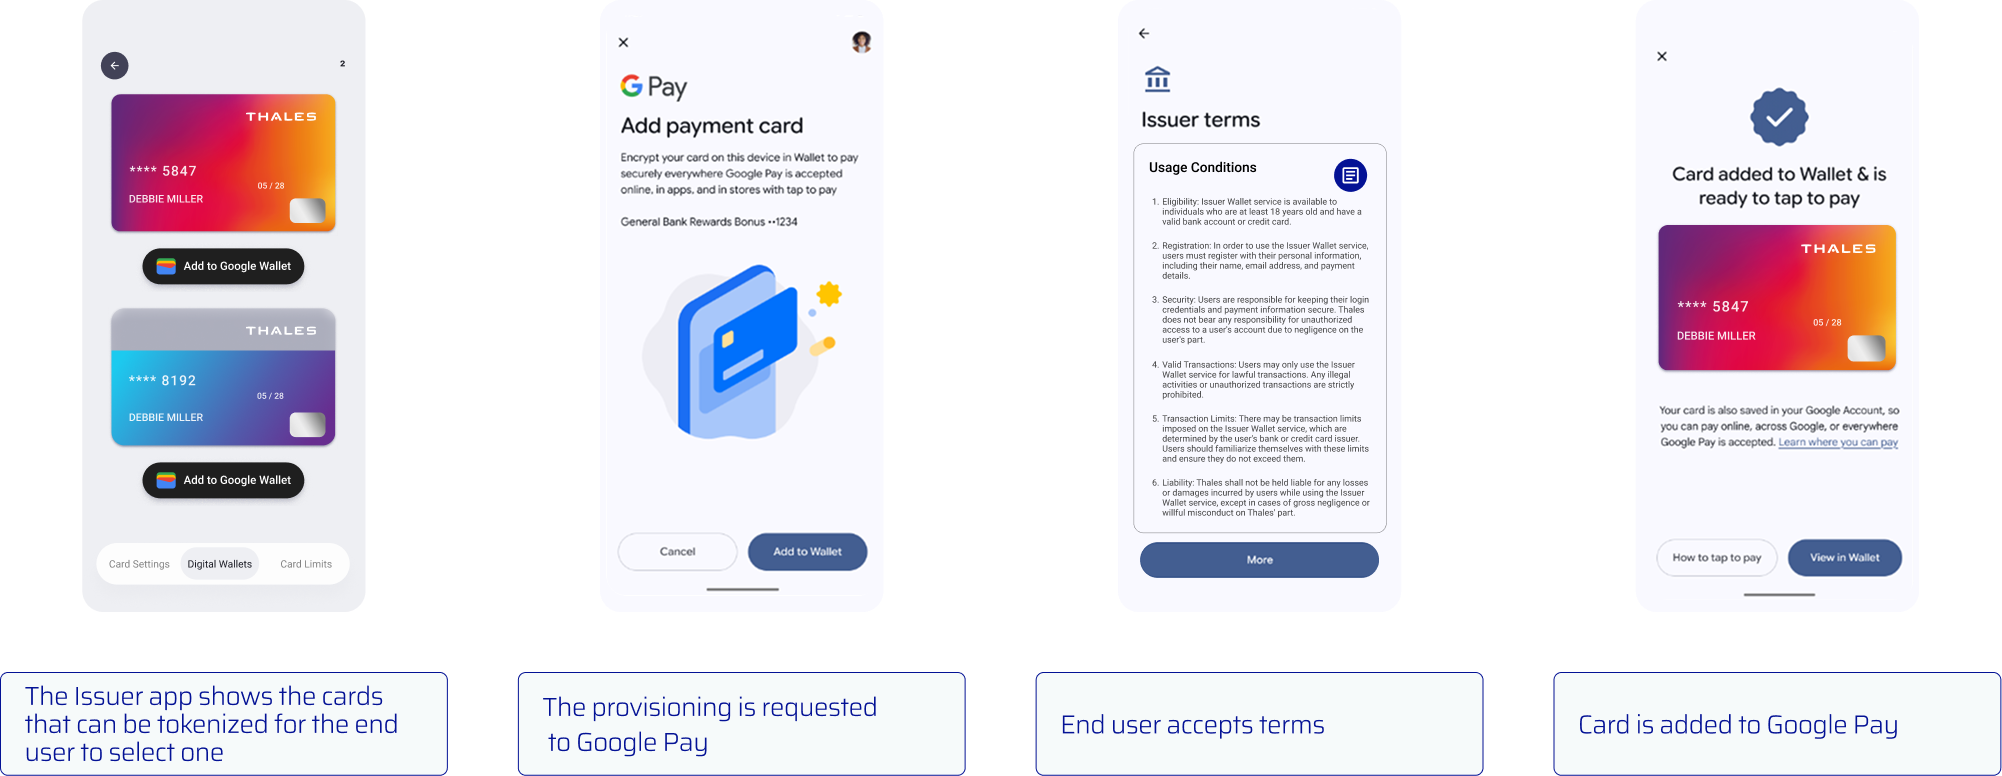
2. The issuer application authenticates the end user and starts Tokenization.
#### Discovery and authentication
{% stepper %}
{% step %}
**Open Google Wallet**
The end user opens Google Wallet and selects the option to add a payment card.
{% endstep %}
{% step %}
**Select the issuer application**
Google Wallet displays the issuer application when its Android manifest meets the registration requirements.
{% endstep %}
{% step %}
**Authenticate the end user**
Google Wallet opens the issuer application. The issuer application authenticates the end user.
{% endstep %}
{% endstepper %}
#### Select and provision a card
{% stepper %}
{% step %}
**Display eligible cards**
After authentication, use the D1 SDK to [retrieve each card's digitization state](/push-provisioning/implement-push-provisioning/implement-push-to-digital-wallets/get-the-card-digitization-state.md). Display cards that are eligible for Tokenization.
{% endstep %}
{% step %}
**Start provisioning**
When the end user selects a card, call the [D1 SDK push-to-wallet API](/push-provisioning/implement-push-provisioning/implement-push-to-digital-wallets/push-to-the-digital-wallet.md) with `options` set to `1`.
{% endstep %}
{% step %}
**Accept terms and conditions**
Google Wallet presents the applicable terms and conditions. The end user accepts them to continue.
{% endstep %}
{% step %}
**Add the card to Google Wallet**
Google Wallet completes Tokenization and adds the card.
{% endstep %}
{% endstepper %}
### Enable bounce provisioning
#### Complete registration
Complete the required bounce provisioning registration [form](https://developers.google.com/pay/issuers/apis/push-provisioning/android/bounce_provisioning) before enabling the feature.
#### Update the Android manifest
Bounce provisioning is available on physical Android devices starting with D1 SDK version `4.5.0`.
Create an activity that displays eligible cards. Add an **Add to Google Wallet** button for each card. Then declare the `ACTION_INITIATE_PROVISIONING` intent in `AndroidManifest.xml`.
```xml
```
{% hint style="warning" %}
Include the `category` element in the `intent-filter`. Without it, Google Wallet does not display the issuer application for bounce provisioning.
{% endhint %}
#### Create new Android activity
{% code title="Google Pay Bounce Provisioning Activity (Java)" lineNumbers="true" %}
```java
// import
public class BounceProvisioningActivity extends FragmentActivity {
private D1Task d1Task; // initialize with real D1Task instance
@Override
protected void onCreate(@Nullable Bundle savedInstanceState) {
super.onCreate(savedInstanceState);
Intent intent = getIntent();
if (intent != null
&& "com.google.android.gms.tapandpay.issuer.ACTION_INITIATE_PROVISIONING"
.equals(intent.getAction())) {
// Display the list of all eligible cards and an Add to Google Wallet button beside each card.
// Clicking Add to Google Wallet button will invoke AddDigitalCardToOEM with options parameter set to 1.
} else {
// Not a bounce provisioning request
}
}
@Override
public void onActivityResult(int requestCode, int resultCode, @Nullable Intent data) {
d1Task.handleCardResult(requestCode, resultCode, data);
}
}
```
{% endcode %}
---
# Agent Instructions
This documentation is published with GitBook. GitBook is the documentation platform designed so that both humans and AI agents can read, navigate, and reason over technical content effectively. Learn more at gitbook.com.
## Querying This Documentation
If you need additional information that is not directly available in this page, you can query the documentation dynamically by asking a question.
Perform an HTTP GET request on the current page URL with the `ask` query parameter, and the optional `goal` query parameter:
```
GET https://docs.payments.thalescloud.io/push-provisioning/implement-push-provisioning/implement-push-to-digital-wallets/google-wallet-bounce-provisioning.md?ask=&goal=
```
`ask` is the immediate question: it should be specific, self-contained, and written in natural language.
`goal` is optional and describes the broader end goal you are ultimately trying to accomplish on behalf of the user. GitBook uses it to tailor the answer towards what is most useful for that goal.
The response will contain a direct answer to the question and relevant excerpts and sources from the documentation.
Use this mechanism when the answer is not explicitly present in the current page, you need clarification or additional context, or you want to retrieve related documentation sections.